Configuring GRUB 2 for multiboot OS [Retro-PC series]
I did not have much experience with boot loaders prior to my Retro-PC project, but I chose to use one of the most popular one. GRUB is a widely used multiboot boot loader, and far superior to anything that Windows XP or any other Windows versions could provide for a boot manager.
First, we had a multiboot strategy, and then we installed Ubuntu, and, as a result, we already have GRUB 2 installed. Even if you don’t see a boot menu when booting your fresh Linux installation, you can verify the existence of it keeping shift key down when you boot. You should see GRUB menu possibly containing options running Ubuntu in two different modes and memory tests. Going to console with ‘c’ you can run any GRUB commands, and manually boot your PC the way you want.
The issue with GRUB is that it is also rather complex to get into, and to have both GRUB “legacy” and GRUB 2 around makes the life of inpatient retroist even harder. Many of the retro-related links you will find in the internets are using the first generation of GRUB, and it does not have much compatibility with GRUB 2.
The key ingredient for isolated multiboot MS-DOS / Windows installations is found at GRUB documentation. The drivemap command is not useful in my case, as I only have one physical disk, but with parttool command, we can choose what partition to show to a particular MS-DOS / Windows installation. It took me a while to understand it, but changing a partition with parttool is “sticky” so that any changes you make are preserved during the system boots. If you hide a partition, it will be hidden until you (or one of you GRUB menu entries, or some other tools, such as GParted) unhide it.
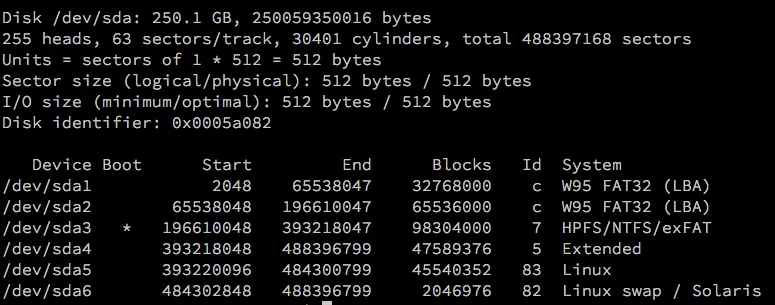
Before we create new menu entries to GRUB menu, we should check how Linux and GRUB see our partitions. Go to a terminal, and type sudo fdisk -l. In my PC, the result looks like this:

Then boot your PC, and holding the shift key to access GRUB, and picking ‘c’ for the console, type ls. For each listed partition, you can get more details by typing e.g. ls (hd0,msdos1) (hint, use TAB-key for smart complete). The partitions should look something like this:

hd0 refers to the only disk I have inside my PC, and msdos is a parition under MBR partition table — it does not refer to a MS-DOS filesystem! You may also notice that “msdos4” is missing from the list, and it probably goes for the extended partition that is not visible on the list (only the logical partition inside the extended partition are).
We can configure “MS-DOS”, “Windows 98” and “Windows XP” to GRUB even before we actually install them.
Edit /create /etc/grub.d/40_custom:
#!/bin/sh
exec tail -n +3 $0
# This file provides an easy way to add custom menu entries.  Simply type the
# menu entries you want to add after this comment.  Be careful not to change
# the 'exec tail' line above.

menuentry "MS-DOS" {
  parttool (hd0,msdos1) hidden-
  parttool (hd0,msdos2) hidden+
  parttool (hd0,msdos3) hidden+
  parttool (hd0,msdos5) hidden+
  parttool (hd0,msdos6) hidden+
  set root=(hd0,msdos1)
  chainloader +1
  parttool ${root} boot+
}

menuentry "Windows 98" {
  parttool (hd0,msdos1) hidden+
  parttool (hd0,msdos2) hidden-
  parttool (hd0,msdos3) hidden+
  parttool (hd0,msdos5) hidden+
  parttool (hd0,msdos6) hidden+
  set root=(hd0,msdos2)
  chainloader +1
  parttool ${root} boot+
}

menuentry "Windows XP" {
  parttool (hd0,msdos1) hidden+
  parttool (hd0,msdos2) hidden+
  parttool (hd0,msdos3) hidden-
  parttool (hd0,msdos5) hidden+
  parttool (hd0,msdos6) hidden+
  set root=(hd0,msdos3)
  chainloader +1
  parttool ${root} boot+
}
Copy /etc/grub.d/10_linux.dpkg-dist to /etc/grub.d/50_linux and edit /etc/grub.d/50_linux:
# Adjust Ubuntu name to contain less crap
title="Ubuntu"

# Append these lines to make sure no partion are hidden for Linux
# Append inside linux_entry() function
printf " parttool (hd0,msdos1) hidden-n"
printf " parttool (hd0,msdos2) hidden-n"
printf " parttool (hd0,msdos3) hidden-n"
printf " parttool (hd0,msdos4) hidden-n"
printf " parttool (hd0,msdos5) hidden-n"
Make only necessary files executable, e.g. by:
cd /etc/grub.d
sudo chmod a-x *
sudo chmod a+x 00_header
sudo chmod a+x 40_custom
sudo chmod a+x 50_linux
Edit /etc/default/grub:
GRUB_TIMEOUT=-1 # No timeoutOnce the configurations are made, we are ready to run sudo update-grub. Only after this step any of changes will be visible on the boot menu. You can verify that /boot/grub/grub.cfg makes sense (contains your configs and nothing else). If you didn’t see any errors, reboot your PC, and see it yourself.
Now, if you try to launch any of the non-installed operating systems, you will end up with an error complaining there was nothing to boot to. But this is just fine, and we will install MS-DOS, Windows 98 and Windows XP soon. We should not rush, however, until we have properly backed up the MBR.
